

Features スポット溶接条件管理アプリ【COUN-TECH NV】
DX spot welding condition management!
"Its hard to manage welding conditions on paper!" "I want to record electrodes and drawings as a set!"How to use the app:Launch the app and select Material → Thickness on the first page.
Welding conditions can be registered for each material and plate thickness on the next page.
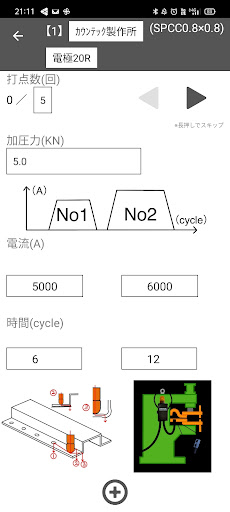
On the welding parameter page, you can register pressure, current, and welding time as welding conditions.
You can also register photos, so you can register drawings, work photos, etc.
Registered welding conditions can be called on the welding point management page.
The number of welding points can be registered for each welding condition.(1) Material and thickness selection page(2) Welding condition selection page③Rating management page④ Welding parameter page①:Select the material and thickness in order.
Materials and plate thicknesses can be additionally registered and deleted.
Basically, the plate thickness above is registered as a standard, but it is also possible to register a combination of upper and lower plates.
Nuts are also registered, and other welding targets can also be registered.②:Press the
➕ button to register the welding condition name.
Easy-to-understand names such as electrode shapes and workpiece names can be registered.
In addition, there is a remarks column, so you can fill in notes etc.③:*If you do not need to manage the number of hits, you can skip this step.You can register the number of hits.
When the number of welding points is over and you need to switch to the next welding condition, you can add a welding condition.
If you press the
➕ button, you can select the material plate thickness in the popup and add the registered welding conditions.④:You can register your details.
Pressing force, current value, and energization time can be registered.
Also, if you press the
➕ button, you can also register photos, so you can register photos of workpieces, drawings, etc.
You can register No1 and No2 for current value and energizing time for 2 times energizing.
Camera Features
Advanced camera features with editing capabilities.
See the スポット溶接条件管理アプリ【COUN-TECH NV】 in Action

Get the App Today
Available for Android 8.0 and above